P Number: P12206538
DMU Email: p12206538@myemail.dmu.ac.uk
Email: ChrisTheJam@gmail.com
 |
| Albedo |
 |
| Metalness |
 |
| Normals |
 |
| Roughness |
Note: If I generally refer to anything the text will be a link to what I'm referring to.
The first of three. As an artist with a primary base in 2D work it seems completely out of character to pick a character brief. Character modelling is such a brutal discipline and probably one of the hardest things to pull off well regarding realism. You've got to know anatomy, costume and generally just how everything you want to put on your character works. What are they wearing, what's it made from, how do I make it look like that. Not to mention all the technical restraints from the briefs 30k triangle budget to the fact that unlike actual clay you actually have this thing called a triangle count that you have to think about. And then there's retopology and texturing. Sounds like a nightmare. And that's the point. I find learning things very attractive and as something I didn't particularly know well it attracted me. Because if it's difficult, I'm learning something. If it's easy it's just me showing off. And as the lead up to my final major project, I believe the style matrix briefs are there to really test the waters of what you want to accomplish with your final major project. So this is really the last chance I get to play around with game art. At least at uni.
Portfolio building is the purpose of the three projects;to leave university as a potential candidate for hiring. For my first project my goal was to produce a well executed and interesting model. To have realistic materials and good edge flow and topology while sticking to the brief. The theme of the project was left open as long as it stuck to the brief. The theme of my character was based on a post apocalyptic world. Inspired by films such as Mad Max and games like Fallout. A raider character that would pillage and kill to survive. My research started when I came across a studio called Wasteland Warriors. Wasteland Warriors are exactly what you think they are-people dressing up as if they were from a wasteland. It's brilliant reference and I drew a lot from it.
I narrowed down various elements that I wanted my character to have. To make it visually easier for me I took the elements of what I wanted and made a quick photobash.
Large bulky armour. Leather or skin mask covering most of the head. Gas mask for harsh conditions. Fur in case the weather turns. And lots of buckles.
I added some sort of traffic cone on the shoulder for some sort of makeshift armour.
The cone looked weird so I toned it down before removing it completely due to it clashing with the overall style.
I moved onto sculpting in zbrush. First things first I needed to get an anatomically correct base down before I did anything else as a lot of the character was showing skin. At this point I was also considering my texture space usage. I wanted the skin to be on a different texture sheet so it could have sub-surface scattering for a more realistic shader. Skin, unlike a matte surface will have light hit it then bounce around. It gives it that soft shading and translucency like when you put a light behind your hand. I also had to figure out fairly early on how I'd do the fur. I looked at one of the games I was playing at the start of the project-Middle Earth: Shadow of Mordor. The game has some really well done character models. In particular I was intrigued by the fur in he game. After closer inspection I realised that to accomplish this fur effect it's just a tesselated displacement map which is fairly easy to do. It creates a really nice effect too. Once I had the theory down I was ready to rock and roll. After spending a good few days sculpting the body mesh I turned to adding armour by using masks and extruding in zbrush. At the end of the first week, I had my high poly more or less complete.
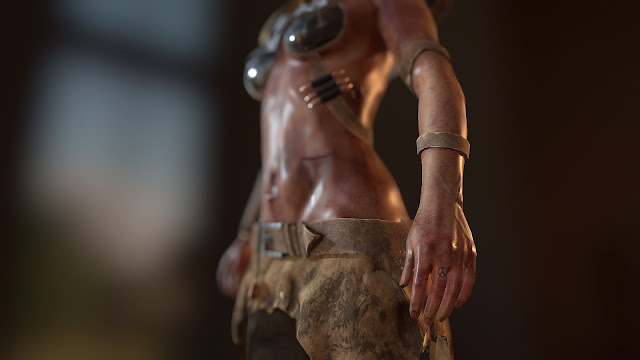
In terms of design, I added a few things on the go. The bullets on her straps. And probably most notably, the goggles. From the concept I saw the dark spots on her head and turned them into goggles which I think helps with the silhouette and the post apocalyptic vibe. Also hanging off the belt, I added some ears. Adding to the narrative of the character, maybe she collects the ears of those she's killed. There were a few issues translating the concept into 3D. The street cone on her shoulder mainly. How does it attach, how will it be rigged. I couldn't answer these questions so I later removed it. Not to mention it's jarring colour. A lot of the minor details of the character would be very low poly and would all be done in 3ds max. Once I was happy with my high poly, I moved straight on to retopology to make sure there were no errors one the high poly once it was baked. To retopologise I used zbrush and 3D coat. Zbrush zremesher for organic shapes like the body and 3D coat for hard surface things so I could get more control over the flow of topology. Shortly after I moved on to unwrapping which I know consider incredibly important after this project.
Once I was happy with my UVs (I was very happy) texturing took it's place. I find that people often falter at texturing and it can generally ruin a project. I had previously been learning substance painter therefore I had a decent pbr workflow. I baked the normals, curvature, ambient occlusion and world space normals from the high poly mesh onto the low. The texturing was built up in material layers. So I'd imagine what things were made from and how they were treated. So the metal. What metal is it. How shiny is it. Maybe the metal is painted. Maybe the paint has worn off. To get these weathering affects I'd use all the maps I baked. The curvature is an edge map so I can get edge wear easily. I used the ambient occlusion as a mask for dirt. And the world space to layer dust on the top of the armour. And then finally everything was placed into Marmoset to set up lighting similar to that of any engine and then get renders.
I'm extremely happy with the result of this project. It's always good to challenge yourself in things
you're not accustomed to. I think this is the fifth character I have ever made. The last one being a steampunk pilot that took all of summer to make. In this three week project I have produced a better outcome than the summer long project which is brilliant. The key to all of this was probably my time management which was on point. I assigned a week to each area I saw fit. The first week being sculpting. The second, retopology and unwrapping. And then the final week for texturing. There were a few times when I was working ahead of my schedule by a day or two, but this just allowed me to polish my model a bit more, rig it, and make a little scene from it. I think my strength is also my biggest weakness. I moved too quickly initially which created a few unforeseen problems later on. Things like anatomy, the hands being too small. In terms of my fmp, I now know I can work fairly effectively on characters and producing realistic materials even more so. I don't know if it's necessarily swayed me to make something realistic for my fmp, but it's certainly conditioned me to realism a good amount.December 10th
After reflecting on what I had written here and the week of polish the whole project has come together a lot nicer. I resculpted the ears and hands and retextured the skin and shoulder pads.


No comments:
Post a Comment